Adaptive Cards – open yourself to more content

Enhance User Engagement with Adaptive Cards
In today’s digital landscape, where content drives engagement, businesses are constantly seeking innovative ways to deliver interactive and dynamic content across multiple platforms. Microsoft Adaptive Cards offer a powerful solution, enabling seamless integration and a consistent user experience across various applications.
What Are Adaptive Cards?
Adaptive Cards are a JSON-based UI framework that allows developers to create rich, interactive content adaptable to any platform. Designed to blend naturally with host applications, Adaptive Cards ensure that the content matches the platform’s native look and feel. For example, a contact card in Dynamics 365 can seamlessly appear in Microsoft Teams with Teams’ distinctive interface.
Popular Platforms Supporting Adaptive Cards:
- Microsoft Teams
- Outlook Actionable Messages
- Bot Framework Webchat
- Cortana Skills
- Windows Timeline
- Windows Notifications
As Microsoft states, “Users win because everything feels familiar. Host apps win because they control the user experience. And Card Authors win because their content gets broader reach without any additional work.”
Step-by-Step Guide: Creating and Sending Adaptive Cards in Outlook with Power Automate
Step 1: Design Your Adaptive Card
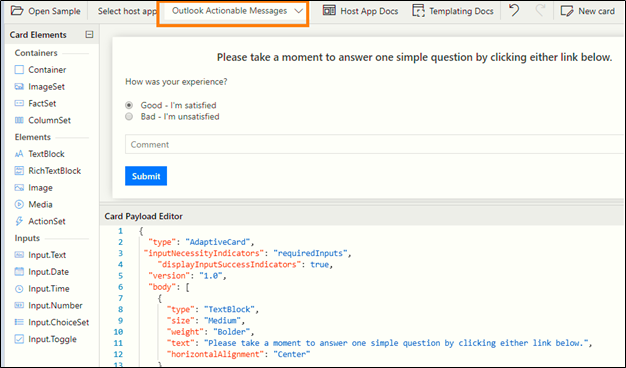
- Visit https://adaptivecards.io/designer/ to create your card by dragging and dropping elements or customizing existing templates.
- Select Outlook Actionable Messages as the host app for seamless integration.

Sample JSON for an Adaptive Card:
{
  “type”: “AdaptiveCard”,
  “inputNecessityIndicators”: “requiredInputs”,
  “displayInputSuccessIndicators”: true,
  “version”: “1.0”,
   “body”: [
    {
      “type”: “TextBlock”,
      “size”: “Medium”,
      “weight”: “Bolder”,
      “text”: “Please take a moment to answer one simple question by clicking either link below.”,
      “horizontalAlignment”: “Center”
    },
    {
	  “type”: “TextBlock”,
      “text”: “How was your experience?”
    },
    {
      “type”: “Input.ChoiceSet”,
      “id”: “SingleSelectVal”,
      “isRequired”: true,
      “errorMessage”: “Please select one of the above option”,
      “style”: “expanded”,
      “value”: “1”,
      “choices”: [
         {
           “title”: “Good – I’m satisfied”,
           “value”: “1”
         },
         {
           “title”: “Bad – I’m unsatisfied”,
           “value”: “2”
        }
       ]
    },
    {
     “type”: “Input.Text”,
     “placeholder”: “Comment”,
     “style”: “text”,
     “maxLength”: 0,
     “isRequired”: true,
     “errorMessage”: “Required”,
     “id”: “SimpleVal”
    }
   ],
  “actions”: [
    {
    “type”: “Action.Http”,
    “title”: “Submit”,
    “url”: “https://prod-29.southeastasia.logic.azure.com:443/workflows/b9277c7040154322b45dbf536ba0f6ac/triggers/manual/paths/invoke?api-version=2016-06-01",
    “id”: “submit”,
    “style”: “positive”,
    “method”: “POST”,
    “body”: “{\”choices\”:\”{{SingleSelectVal.value}}\”,\”comment\”:\”{{SimpleVal.value}}\”}”,
      “headers”: [
      {
        “name”: “Authorization”,
        “value”: “”
      },
      {
        “name”: “Content-type”,
        “value”: “application/json”
      }
     ]
    }
 ]
}
Step 2: Automate Email Delivery with Power Automate
- In Power Automate, create a new flow with a trigger (e.g., manual or automated).
- Add a Compose action and paste the Adaptive Card JSON.
- Use the Send an Email (V2) action and insert the Adaptive Card within HTML tags:

<script type="application/adaptive card+json">
</script>

Step 3: Capture Responses with Power Automate
- Create a new flow with the When an HTTP request is received trigger.
- Define the JSON schema to collect responses:
{
  “choice”: “text”,
  “reason”: “text”
}

- Add two variables to store the response. You can use the snippet below to extract the response.
split(triggerBody()?[‘choices’],’,’)
split(triggerBody()?[‘reason’],’,’)

- Send confirmation notifications and update the Adaptive Card with the response using the Response action.

Benefits of Using Adaptive Cards for Business Communication
- Cross-Platform Compatibility: Deliver content seamlessly across Microsoft Teams, Outlook, and more.
- Enhanced User Engagement: Simplify interactions with intuitive and responsive design.
- Streamlined Automation: Integrate with Power Automate for dynamic workflows and real-time feedback collection.
CARD-UPDATE-IN-BODY = True


Conclusion
Adaptive Cards empower businesses to create dynamic, interactive content that enhances user engagement across multiple platforms. By integrating Adaptive Cards with tools like Power Automate, organizations can streamline workflows and improve communication efficiency. Start leveraging Adaptive Cards today to transform how you connect with your audience!
Have ideas to improve Adaptive Cards or innovative use cases? Share your thoughts in the comments below or contact ECLEVA to explore how we can bring your ideas to life!


